Monday, September 3, 2012

Keeping the Crafting Bug Alive!

Above: This sweet little primitive bear is on his way to a new home.
 
 
Above: Thank you card. I tried to make a ATC card but the 2 1/2" x 3 1/2" size was a little too small for me. I do want to make alot of ATCs (artist trading card) so that I can fill my 7 gypsies rolodex. I have had the rolodex for about 5 years now and have never really made anything for it.

Above: Heart Pincushion that I made as a thank you gift. Sorry, I should have taken a picture of it before I sealed the bag. The plaid looks a little loud but it is not that bright. The brown "nest" in the middle is actually a rosette with a pearl in the middle. I used hand dyed ribbon, hand stamped tag, picture of my great grandmother, piece of vintage style lace and corsage pin.

Above: Little better with a white background.
 
I know that it has been a while since I blogged here but I just haven't been making as much primitive stuff as I have whimsy/cutesy stuff. I have finally cleaned up my craft room and it is a very whimsy one now. My house is decorate for the most part primitive, but I also love red, aqua, sunny yellow and cutesy stuff. This is why my craft room took on a brighter look. Now I can enjoy the best of both worlds and it no longer has to be a competition of Whimsy vs. Primsy!! So, if you haven't seen the pics of my craft room go on over to www.littleredhenstitches1.blogspot.com and check it out :)
 
Have a wonderful night and keep that crafting bug alive!! Go ahead....make something!!!
You'll be glad you did!!
Holly

Sunday, March 4, 2012

Piece by Piece

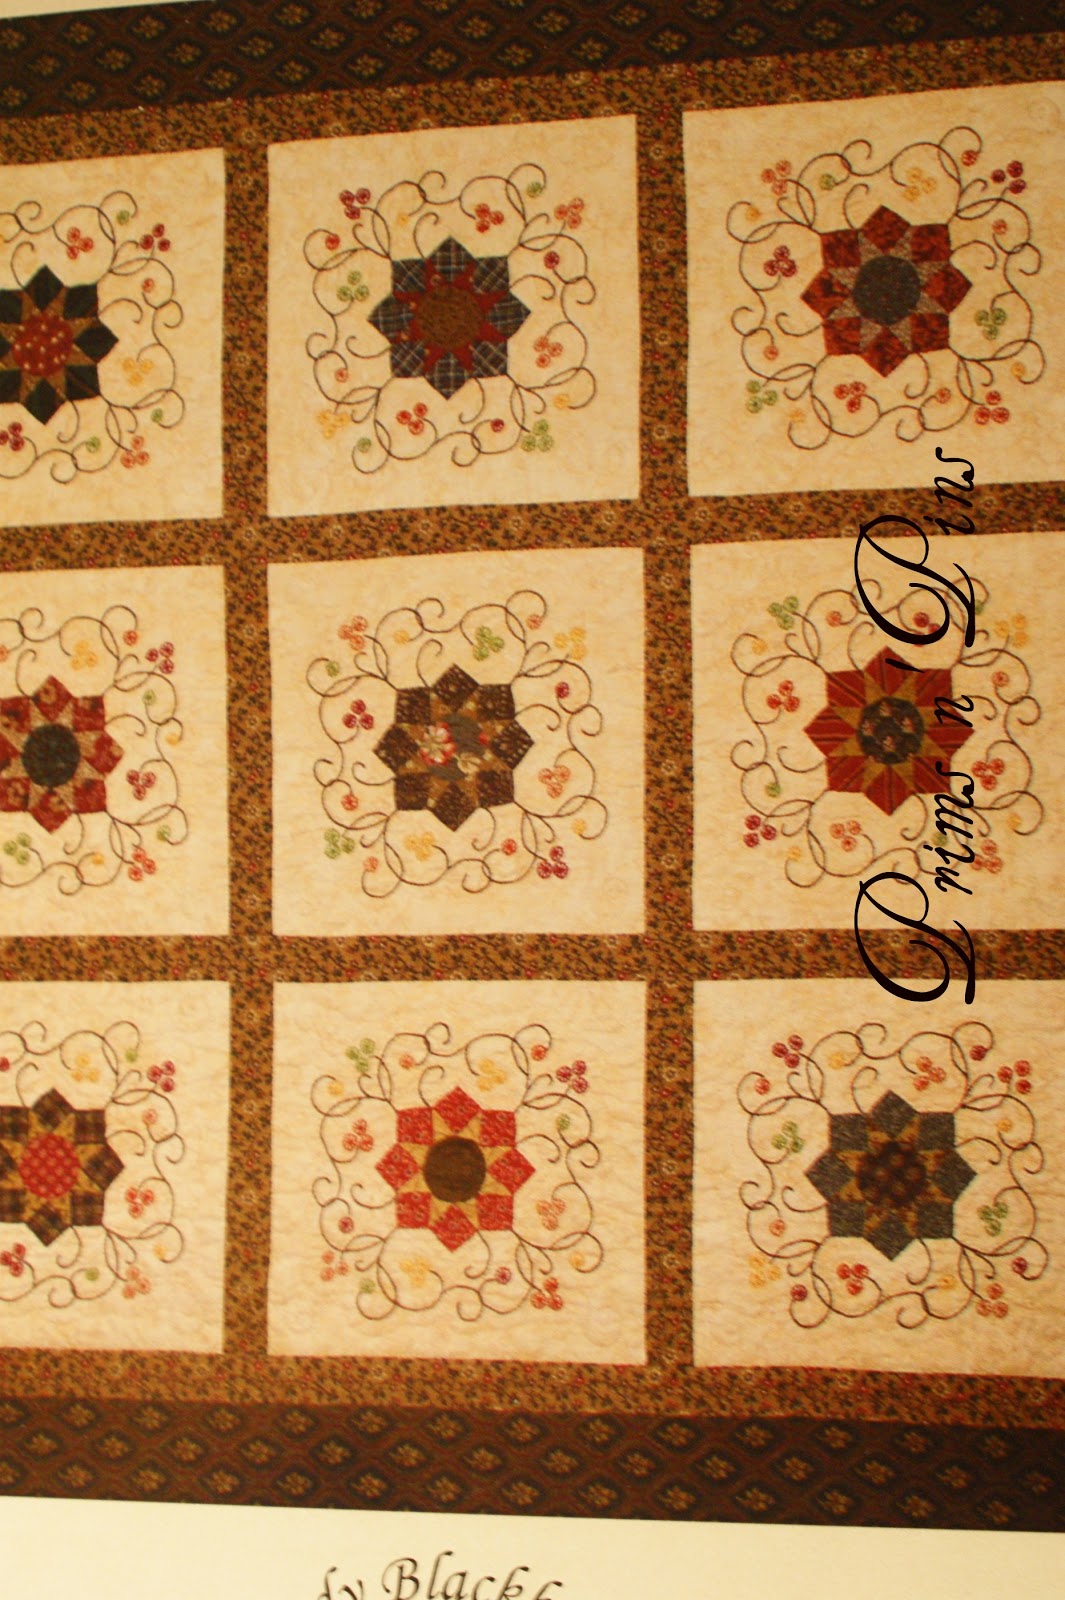
I love to hand embroider and quilt. So, when I saw this quilt being offered as a class at my local quilt shop I was so excited. Well.....that was 3+ years ago. Since then the quilt shop has closed and I lost interest. About 3 weeks ago I was cleaning out the craft studio and came across it again. Interest piqued. I need to finish this quilt. I had 11 blocks finished. The 12th block was cut out and the embroidery lines were all ready traced onto the fabric, but the center "flower" was incomplete. Oh no.....I need just one more purple triangle. Where in the world was that fabric? It has been 3+ years after all.
Above: This is what the quilt will look like when I finish. It is all hand pieced and quilted. I haven't decided whether to actually hand piece the squares and sashes or machine piece them on my featherweight. I haven't done a lot of sewing on my Featherweight so this would be the perfect project.

Above: Here's the completed square. The center flower is appliqued on. I forgot to mention that the "flowers" are all hand pieced. Really very easy and fast. Great to do in front of the TV. This was my first time to really "hand piece". I have hand pieced in the past but that was when I was around 12. I will have to show you that quilt some day.


Above: The last unfinished piece. See that greenish circle in the top right corner. Guess what? Yep...I forgot how to sew that little guy in. Shhh...don't tell, I appliqued it in. That was the easiest thing for me to do. The instructions were not really that clear on how to sew it in and I forgot all of the short cuts and handy tips :(


Above: here's what the "flower" looks like on the back. Do you see the black lines? Those were made by a stamp! This is a Cindy Blackberg quilt and she uses her special stamps in place of paper templates (with her patterns you do have the option to either purchase the stamps or you can use paper templates). I love the stamps, especially if this is your first time hand piecing. Hand piecing is a little different than machine piecing. Notice the inner black line above. This line is the stitching line. I love this quilt and can't wait to finish it. If you have never tried hand piecing, I would suggest you try it. It's a lot of fun and their are a alot of tutorials on line to get you started. If you have any questions please don't hesitate to leave a comment. Oh yea, I did find the purple fabric. It was in a box labeled "Civil War Repod. Fabrics". Gotta love labeled boxes, especially when what is labeled on the box is actually in it!

Have a wonderful day and happy piecing!
Holly

Sunday, February 12, 2012

Stitchin' Time


I have been trying to catch up on some projects that have been on my mind for some time. I started this sweet little piece about 2 years ago. I found it real slow to work. I was stitching row by row. This makes progress hard to visualize. I had only completed the outline of the house and a couple of the windows. Well, this past week I ran across it again and thought that it's time to finish it. An idea hit me when I looked at it, why not stitch in grids. And you know what? I did all of this in three days! Most of the house, finished the bird (still needs eye) and the lady's hair at bottom. I now have the lady almost completed.

Above: Of course there are big boo boos. The main one being the spacing of the windows. Oh well. When finished it is going to be a sewing roll.

This is what it should look like. It is a pattern from Niky's Creations.
I will keep you updated on my progress. I am so excited how fast I am stitching now!
Blessings,
Holly

Monday, November 21, 2011

Say "Cheese"....Macaroni and Cheese

I can't believe that Thanksgiving is this week! I have been cooking all day. I have been making macaroni & cheese, mini pumpkin pies, homemade bread and a macaroni casserole. My family loves the mac & cheese. I am not sure where the recipe came from but we have enjoyed it for at least 17 years. It is a very simple and easy recipe. I just top it with cheese, but you could top it with Ritz crackers or dry bread crumbs....yummy!


Favorite Mac & Cheese
2 TBS cornstarch
1/2 tsp dry mustard
2 1/2 c milk
8 oz shredded sharp cheese
1 tsp salt
1/4 tsp pepper
2 TBS margarine
8 oz macaroni, cook 6 minutes and drain

Set cooked and drained macaroni aside. In a medium saucepan, combine cornstarch, salt, dry mustard and pepper; stir in milk until smooth. Add margarine, stirring constantly. Bring to a boil over medium-high heat and boil 1 minute. Remove from heat; reserve 1/4 c cheese for topping. Stir in remaining cheese until melted. Add macaroni. Turn into greased 2 quart casserole dish. Sprinkle with reserved cheese. Bake in 375 degrees oven for 25 minutes or until hot and bubbly.


Have a great and wonderful Thanksgiving and may God bless you and your family,
Holly

Wednesday, October 26, 2011

I "Pine" Pinterest


pine (pn)
v. pined, pin·ing, pines
1. To feel a lingering, often nostalgic desire
 
I have recently discovered Pinterest. I love it. Basically it is like a big scrapbook of pictures. You "pin" a photo and the comment about it and everyone gets to share what you discovered or "pinned" from the internet. As soon as I can figure it out, I will put my Pinterest button to the right. To give you a little taste, here are some of the pictures that I pinned or pine(d).


Have a great Wednesday,
Holly

Saturday, October 15, 2011

If Stitches Could Talk

Old quilts....I love them. Even with the frayed edges, less than perfect stitches, mismatched fabric scraps, holes, non meeting corners...they are wonderful! If you look closely, you can see the love in each stitch. A loving grandmother, mom, sister, daughter or aunt made these necessary covers. They would keep the family nice and toasty during those nippy nights. Now days, we mainly make quilts for show. Our families are kept warm by furnaces, electric blankets (not sure if anyone uses those anymore), or covers made in China. Very few of us have hand me down Grandmother quilts. I am very fortunate enough to have one of my Grandmother's that my great Grandmother made. I remember using it as a child visiting my grandparents. They did not have a furnace for heat. Just a fireplace and a couple of room gas heaters. We kept warm at night by using many layers of quilts and blankets. Once you crawled into bed, you didn't move. For if you moved, the spot that you had been warming up suddenly disappeared, immediately replaced by icy coldness. Fun times and good memories!!

Above: This antique quilt is one that I purchased at an antique mall. I do have a few rules that I have to follow (because if I didn't, my house would be over run with quilts :).
Rules:
1. They can't be more that $25.
2. It has to be a complete quilt. I don't want pieces of quilts, although I have broken this rule and bought some pieces that were orphaned quilt squares and scraps. I just couldn't pass these up, because the materials used were feed sacks, the quilt square pattern was difficult, or I could see the time and workmanship put into the piece was exceptional.
3. Old traditional non-pretty farmer feed sacks were used to back the quilt. I find these charming.
4. The quilting was done in a Baptist Fan style--LOVE!!
4. The quilt just "spoke" to me.

Above: Just look at the scrappyness of this quilt. It has the Baptist Fan pattern hand quilted into it. The quilt block is complex. Look at the curves. This quilt was also hand pieced. 
Above: Not sure what the name of this particular quilt pattern is. These fabrics look like they could have been scraps from clothing. The borders look like more of that farmer feed sack material. It is a loose weave.

Above: See the repairs on the left. I can see the shadow of the material underneath the patch. Not sure if I should take off the patch and repair it correctly or not. The patch was poorly sewn. This quilt must have been used alot. I wonder how they washed it.

Above: Look at the binding. The white and blue is a recent patch. The rest of the binding is actually the back pulled over the edge and hand stitched down.

Above: Here's a look at the back. This is the feed sack material that I call "Farmer's Feed sack", because it is very plain and loosely woven. I can make out "Jim Dandy", "Cow Feed", "Purity and Quality" and some other stuff that I can't quite make out. It is too faded.

Above: "100lbs"
That's all that I have for today. I hope that you have a wonderful and blessed weekend!
Holly

Saturday, September 3, 2011

Can You Yo-Yo?

I love yo-yos. The fabric ones that is. I think they are so adorable and versatile. I have used them on: cards, hair bows, quilts, clothespins, tags, aprons, potholders, pincushions, pin toppers, and on many other things. They are so simple to make. You don't even need a fancy schmancy yo-yo maker. Just some fabric, needle and thread. You can also make them any size that you want. A little hint: the size of yo-yo you want is about half the size of the circle you cut. For example, if you want a 2" yo-yo, just cut a 4 1/4" circle. The 1/4" is the edge that you will turn down.

Step 1: I love using a compass for my circles. I just have a cheap one from Walmart. I set the compass to 1 1/4" (zoom on picture for close up). This will make a 2 1/2" circle. This circle will form a yo-yo approximately 1" - 1 1/4". Draw the circle onto paper and cut it out.

Step 2: Cut the circles out of fabric.

Above: Step 3: Fold the edge down 1/4" (I do this as I am making the running stitch) and make a running stitch around the circle. **Make sure the thread that you are using is strong. Dental floss is great, but it only comes in one color: white. I love to use embroidery floss. You can use two or three strands and of course it comes in 1000s of colors (well...maybe hundreds, but still that's a lot!).

Above: Make sure you leave the tail hanging when you start the running stitch and do not tie the tails together when you finish.

Above: Step 4: Now draw up the tails and tie. Hint: I have found that the closer you get the running stitch to the edge the smaller and more uniformed the gather will be. See in the above picture how the gather is kind of bunchy and not very neat looking. I made the running stitch between 1/8"- 1/4" from the edge. This look is cute, but not what I was going for. In the "above, above" picture of the running stitch (blue circle) I made the stitches really close to the edge.


Above: Here's the difference in stitch placement. One on left (orange) stitch was placed approximately 1/4" from edge and on the right (blue) it was placed almost to the edge.

Above: Happy Little Yo-Yos! I love using them on clothespins. Fun!!
Hope you have a wonderful Labor Day Weekend and don't forget to keep those ten little fingers busy!!
Holly